Creating a new project
Its advisable when creating a new richmedia unit to first scaffold the initial project This will save you a lot of time and effort. Generate or "scaffold" a new banner project. This will generate all the necessary files and folder structure you need for the project.
Step 1
In the terminal, make your way to a new project folder of your choosing, e.g. documents/work/my-banner-project.
yo display-boilerplate
In this menu you can use the arrow keys to navigate the cursor.
? What do you want to do?
  Create quick unit (with default parameters)
❯ Create display units (you can create multiple or just one)
Step 2
We’re just going to create a banner using the second option in this guide, hit Enter to select.
Enter the name of the project or just hit enter to use the default, which is the folder name.
Step 3
Select the first unit you would like the generator to create. Use the arrow keys to navigate and hit Enter
when ready.
Creating banner
? Please select a set for your unit: (Press <space> to select, <a> to toggle all, <i> to invert selection, and <enter> to proceed)
 ◯ 160x600
 ◯ 300x50
❯◉ 300x250
 ◯ 300x600
 ◯ 320x50
 ◯ 320x240
 ◯ 320x480
(Move up and down to reveal more choices)
Enter the directory where you wish the source files to be placed. Just hit enter to use the default, which is something
like ./src/{size}x{width}
Select the type of banner:
? Please select a type you want: (Use arrow keys)
❯ plain
  doubleclick
  flashtalking
Then you will have to answer which units you want to have their own html. You will need to answer the same with the CSS and the JS:
? Please select a set for your unit: 300x250
? Please select a type you want: plain
? Where do you want to put it? ./src/plain/
? Please select display unit with separate html: 300x250
? Please select display unit with separate javascript: 300x250
? Please select display unit with separate css: (Press <space> to select, <a> to toggle all, <i> to invert selection, and <enter> to proceed)
❯◉ 300x250
Step 4
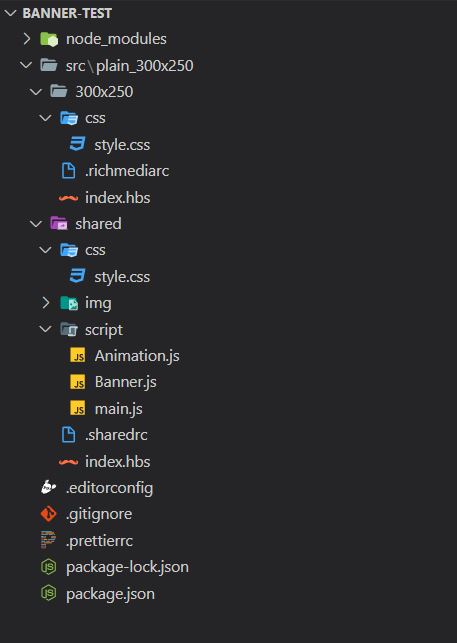
The generator will generate the basic template files and install the according node modules as well. This process will take a minute. When it’s done, you’ll end up with a directory looking something like this:
| Filename | Description |
|---|---|
| node_modules | all the packages / libraries your project |
| src/300x250/[.richmediarc] | The configuration file for the richmedia-temple-server, This file is used so that the richmedia-temple-server knows what directories are richmedia units. |
| src/shared/script/main.js | Javascript File this is referenced by the .richmediarc file. |
| src/shared/script/Animation.js | The animation javascript code. |
| src/shared/script/Banner.js | The banner javascript code. |
| src/shared/css/style.css | Main CSS file, this file is referenced by the .richmediarc file. |
| src/shared/index.hbs | Main HTML (with handlebars) file, this file is referenced by the .richmediarc file. |
| .editorconfig | configuration file for you editor. So everyone atleasts uses the same basic settings. |
| .gitignore | configuration file used by git so it knows which files to ignore. |
| .prettierrc | A configuration file for prettier printer |
| [package.json] | A configuration file for NPM / YARN, one of the most important files in your project. |
