Generate a build
If you check the build is actually a script which is found in package.json, which in turn runs the command dds --mode production. After you execute this script, it will start searching for .richmediarc files in all the directories and subdirectories of your project. You’ll see something like this:
npm run build
“build” is actually a script which is found in package.json, which in turn runs the command dds --mode production. After you execute this script, it will start searching for .richmediarc files in all the directories and subdirectories of your project. You’ll see something like this:
? Please choose the current build to start. (Press <space> to select, <a> to toggle all, <i> to invert selection)
>( ) all
( ) ./src/300x250/.richmediarc
( ) ./src/300x600/.richmediarc
( ) ./src/728x90/.richmediarc
( ) ./src/970x250/.richmediarc
Here, you can select which units you wish to build. Navigate with arrow keys and select (it’s possible to select multiple values) with spacebar, then press enter to confirm your selection.
? save this as a separate command in package.json (y/N)
Use this option to save your selection as a separate command. If you select y, you’ll see something like this:
? please provide a name for your command. You will type something like npm run build:__NAME__
No special chars, spaces, dashes just a single word.
You’ll have to give it a unique name, for example “selection”. Now you will be able to run a dev server with the same selection simply by running
npm run build:selection
It will now compile the banners you selected and then move these files to the ./build directory, along with zipped files which you can use for delivering files or uploading to certain previews.
Build parameters
This parameter might come in handy if you want to create multiple packages (versions) of zips, or if you want to build ads to separate folders. There is a parameter outputDir available that you can run along with the build command.
Property | Description |
|---|---|
| --outputDir | Relative output directory, shorthand is -o. By default ./build, but you can change it to for example ./build/version1/ |
| --skipBuild | Boolean, if it exists, skip compiling ads phase. The --skipBuild variable is useful when you for example already have created ads from Animate CC or Google Web Designer available and you only want to create a preview page around that in order to preview them around. |
| --skipPreview | Boolean, if it exists, skip preview building phase. The --skipBuild variable is useful when you for example first want to build your files, create backup images/video via the ads recorder and then want to create a preview page from all of that together. |
Examples
Via the Commandline
Use the build command creating a custom output dir and skipping building the ads (so only adding the preview page files)
npm run build -- --outputDir ./build/version1/ --skipBuild
or the shorthand version:
npm run build -- -o ./build/version1/ --skipBuild
In your package.json
Use the dds command creating a custom output dir and skipping building the preview page (so only build the ads)
"build:version1": "dds --mode production -o ./build/version1/" --skipPreview
Advanced combinations
Example with a glob and a preview command, for automizing purposes:
"build-preview:version1": "dds --mode production -o ./build/version1/ --choices eyJsb2NhdGlvbiI6WyJhbGwiXSwiZW1wdHlCdWlsZERpciI6dHJ1ZX0= && display-upload -t mm-preview -i ./build/version1 -o 1f08c1d9-b4f1-4a47-831b-409cf070b151/version1/"
Or use combinations of the different scripts, here in doall:v1, build:v1 and upload:v1 are combined to one new script
"build:v1": "dds --mode production -o build/v1",
"upload:v1": "display-upload -t mm-preview -i build/v1 -o 12528e62-6871-47de-abd1-6144e476bc73/v1/",
"doall:v1": "npm run build:v1 && npm run upload:v1",
Mediamonks Preview Page
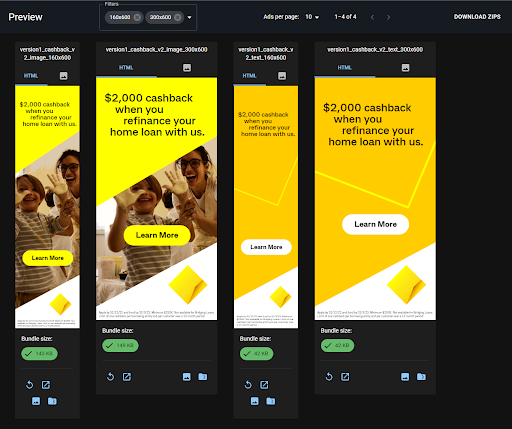
The mm-preview page is our most common used and custom homemade webpage for displaying ads.
It is build in React and has a couple of nice features.
data.json
The page loads in a data file with all information that is needed, such as paths to html/jpg/mp4 and widths and heights of each unit. When you recorded things like gifs, backup images, it will take this in the data.json file as well and store it for eventually prev
maxFileSize
You can set a maxFileSizeparameter in the .richmediarc or .sharedrc config file. It will check the filesize in the preview and give a green or red label comparing it to the given filesize.
"settings": {
  "maxFileSize": "100"
}